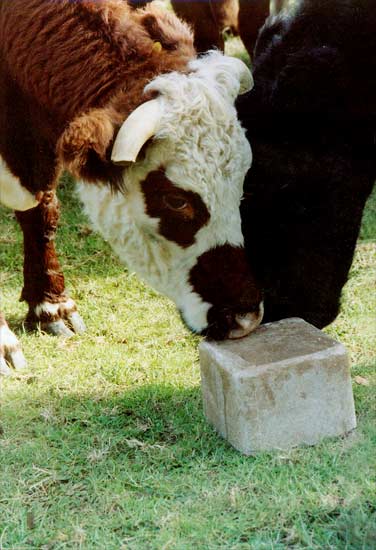
As a farmer or livestock owner, ensuring your animals receive the proper nutrition is crucial for their well-being and overall productivity. While commercial mineral supplements are readily available, creating your own DIY mineral licks can be a cost-effective and customizable solution tailored to your livestock’s specific needs. In this article, we’ll explore the benefits of homemade mineral licks, the essential minerals required, and step-by-step instructions for making them right on your farm.

The Importance of Mineral Supplementation
Minerals play a vital role in various bodily functions of livestock, including growth, reproduction, and overall health. Many of these essential minerals are not present in sufficient quantities in the animals’ regular diet, making supplementation necessary. Providing mineral licks ensures that your animals receive the proper balance of these crucial nutrients, which can result in improved health, increased productivity, and better overall performance.
Benefits of Making Your Own DIY Mineral Licks
Creating your own mineral licks offers several advantages over store-bought supplements:
- Cost-Effectiveness: By making your own licks, you can save money compared to purchasing commercial mineral supplements, especially if you have a large herd or flock.
- Customization: Homemade mineral licks allow you to tailor the mineral composition to meet the specific needs of your livestock based on factors such as species, age, and stage of production.
- Quality Control: When you make your own licks, you have complete control over the ingredients and their quality, ensuring that your animals receive only the best.
- Convenience: With homemade mineral licks, you can easily replenish your stock whenever needed, without relying on the availability of commercial products.
Essential Minerals for Livestock
While the specific mineral requirements may vary depending on the type of livestock you raise, some essential minerals that should be included in your homemade licks are:
- Salt (Sodium Chloride): Salt is crucial for maintaining proper body fluid balance, nerve function, and muscle contraction. It also helps regulate appetite and water intake.
- Calcium: Calcium is essential for strong bones, proper muscle function, and blood clotting. It is particularly important for lactating animals and young, growing stock.
- Phosphorus: This mineral works in tandem with calcium for bone development and maintenance, as well as energy metabolism and reproductive function.
- Magnesium: Magnesium is involved in numerous enzymatic reactions and is vital for proper nerve and muscle function, as well as carbohydrate and protein metabolism.
- Trace Minerals: Trace minerals like copper, zinc, iron, selenium, and iodine are required in small quantities but play crucial roles in various bodily functions, such as immune system support, growth, and reproduction.
Making Your Own Mineral Licks: A Step-by-Step Guide
Now that you understand the importance of mineral supplementation and the essential minerals required, let’s dive into the process of making your own mineral licks. Here’s a step-by-step guide:
Materials Needed:
- Large container or trough for mixing
- Measuring cups or scales
- Mixing tool (e.g., shovel or garden hoe)
- Ingredients (see recipe below)
Recipe for a Basic Mineral Lick:
- 50 lbs. of coarse livestock salt or salt blocks (crushed or coarsely ground)
- 25 lbs. of dicalcium phosphate or monocalcium phosphate
- 10 lbs. of ground limestone or oyster shell (calcium source)
- 5 lbs. of magnesium oxide
- 2 lbs. of trace mineral premix (containing copper, zinc, iron, selenium, and iodine)
Note: The quantities provided in this recipe are suitable for a medium-sized herd or flock. Adjust the amounts proportionally based on your specific needs.
Step 1: Prepare the Ingredients
Start by gathering all the necessary ingredients. If you’re using salt blocks, crush or grind them into coarse particles. Ensure that all the ingredients are in a dry, powdered form for easy mixing.
Step 2: Mix the Ingredients
In a large container or trough, combine all the ingredients using a mixing tool. Thoroughly mix the ingredients until they are evenly distributed throughout the mixture.
Step 3: Optional Additions
Depending on your livestock’s specific needs, you may want to consider adding additional ingredients to your mineral lick. Some optional additions include:
- Molasses: Adding a small amount of molasses (2-5 lbs.) can improve palatability and encourage consumption.
- Vitamin Premix: If desired, you can include a vitamin premix to provide additional nutrients like vitamins A, D, and E.
- Kelp Meal: Kelp meal is a natural source of various trace minerals and can be added to the mixture.
Step 4: Offer the Mineral Lick
Once your mineral lick mixture is ready, place it in a suitable container or trough in a location accessible to your livestock. It’s essential to provide a constant supply of the mineral lick and replenish it as needed.
Tips and Considerations
- Monitor consumption: Keep an eye on how much your animals are consuming the mineral lick. Adjust the amounts or formulation if necessary based on their intake.
- Provide fresh water: Ensure that your animals have access to clean, fresh water sources nearby, as mineral supplementation can increase their water intake.
- Protect from moisture: Store the mineral lick mixture in a dry, covered area to prevent moisture from causing clumping or spoilage.
- Consult a nutritionist: If you have specific concerns or need guidance on formulating a custom mineral lick for your livestock, consider consulting with a livestock nutritionist or veterinarian.
By making your own mineral licks, you not only save money but also gain greater control over the nutritional quality of your livestock’s diet. With the right mineral balance, you can support your animals’ overall health, productivity, and performance, while ensuring a cost-effective approach to their care.


