
Building a DIY shade structure for your backyard animals is less complicated than most people make it, but you do have to take it seriously. Heat stress sets in faster than most keepers expect, and by the time you notice a bird panting with wings spread or a rabbit stretched flat and breathing hard, the animal is already in trouble.
I built this lean-to for our chickens, but the same structure works for ducks, goats, rabbits, or any backyard animal that needs relief from summer heat. The fix is not a fancy cooling system. It is shade, airflow, and cold water, and the most important of those three is shade.
Two summers ago I built a lean-to off the side of our chicken coop. It is still standing, still doing its job, and the flock uses it every hot afternoon from about noon until the sun drops. Here is how I built it and what I would do the same or differently if I were starting over.
Key Takeaways
Why Backyard Animals Struggle in Heat
Chickens, ducks, rabbits, and goats all handle heat differently, but none of them handle it well once temperatures climb into the upper 80s and 90s. Chickens and ducks do not sweat — they regulate body temperature by panting and holding their wings away from their bodies to release heat. Rabbits pant and use their ears to dissipate heat. Goats sweat minimally and rely heavily on shade and airflow.
Heavy chicken breeds like Buff Orpingtons and Australorps are more vulnerable than lighter Mediterranean breeds. Dark-feathered birds absorb more heat than light-feathered ones. Rabbits are particularly heat-sensitive and can die from heat stroke at temperatures that chickens are still managing. Goats will seek shade instinctively but suffer when none is available. Any backyard animal that cannot find its own shade on a 95°F afternoon is at real risk.
The signs of heat stress are recognizable once you know them: panting with the mouth open, reduced activity, standing or lying in one spot rather than moving around normally, and in severe cases unresponsiveness. A bird or animal that is lying on its side in the heat needs to be moved to a cool area and given water immediately. Prevention is far easier than treatment.
Why I Built a Lean-To Instead of Using Shade Cloth
Shade cloth is cheap and fast to put up. I have used it. It works adequately for mild heat, but in our Oklahoma summers it has real limitations. Wind tears it loose from attachments over time. It sags when wet. The UV-blocking percentage degrades after a season or two. And it does nothing to block radiant heat from a metal coop roof that has been baking in the sun all morning.
A solid roof structure does all of that better. It blocks direct sun completely, it does not degrade, it creates a stable covered space the animals can rely on, and attached to the side of the coop it also reduces heat transfer through the coop wall. The lean-to I built has been through two Oklahoma winters and two Oklahoma summers and has not moved.
The tradeoff is time and materials. This is a half-day to full-day build depending on your experience level, and the materials will run you more than a roll of shade cloth. For a permanent setup that you want to last, it is worth it.

Materials and Tools
For a lean-to approximately 8 feet wide by 6 feet deep attached to a standard backyard coop or animal shelter:
Materials:
- Four 4×4 posts, 8 feet long (posts)
- Four 2×6 boards, 8 feet long (roof frame)
- Five 2×6 rafters, 6 feet long
- Corrugated tin roofing panels — available from local metal suppliers, cut to length
- Roofing screws with neoprene washers
- Simpson Strong-Tie post cap hardware and exterior structural screws
- Concrete for setting posts
Tools:
- Post hole digger or power auger
- Circular saw
- Drill and driver bits
- Level
- Speed square
- Tape measure
Building the DIY Shade Structure
The lean-to attaches to the coop at the top and sits on two freestanding posts at the front and two at the back. The roof pitches away from the coop so rain runs off the front rather than back toward the wall.
Step 1: Set the ledger board. The ledger is a 2×6 that runs horizontally along the coop wall at the height you want the high side of the roof. On our coop that was about 7 feet up. I didn’t have to screw it directly into the coop framing because I used four posts.
Step 2: Dig and set the front posts. I dug four post holes 2 feet deep, 8 feet apart in the front and back, measuring out from the coop wall. Set the 4×4 posts in concrete. The tops of these posts sit lower than the ledger board. I cut mine to land at about 6 feet, which gives the roof a decent pitch for water runoff. Check for plumb before the concrete sets.
@waddleandcluck New building projects on the farm. #chickens #GetCrackin #QuakerPregrain #chicken #homesteading #chickensoftiktok #homestead #chickenplayground ♬ original sound – Waddle and Cluck
@waddleandcluck Progress! #chicken #chickens #GetCrackin #QuakerPregrain #homesteading #chickensoftiktok #homestead #chickenplayground ♬ original sound – Waddle and Cluck
Step 3: Install the front beam. A 2×6 runs across the tops of the two front posts, creating the low side of the roof frame. I used Simpson Strong-Tie post cap hardware to connect the beam to the posts. It takes the guesswork out of the connection and makes it significantly stronger than toe-screwing alone. Repeat on the back two posts.
@waddleandcluck Day 2 update on the #chickenplayground #chicken #chickens #homesteading #chickensoftiktok #homestead #diyproject #farmlife ♬ original sound – Waddle and Cluck
Step 4: Run the rafters. Five 2×6 rafters run from the ledger board down to the front beam, spaced evenly. I used Simpson Strong-Tie joist hangers at the ledger end for a clean, solid connection. A speed square and a consistent rafter tail cut keeps everything lined up.
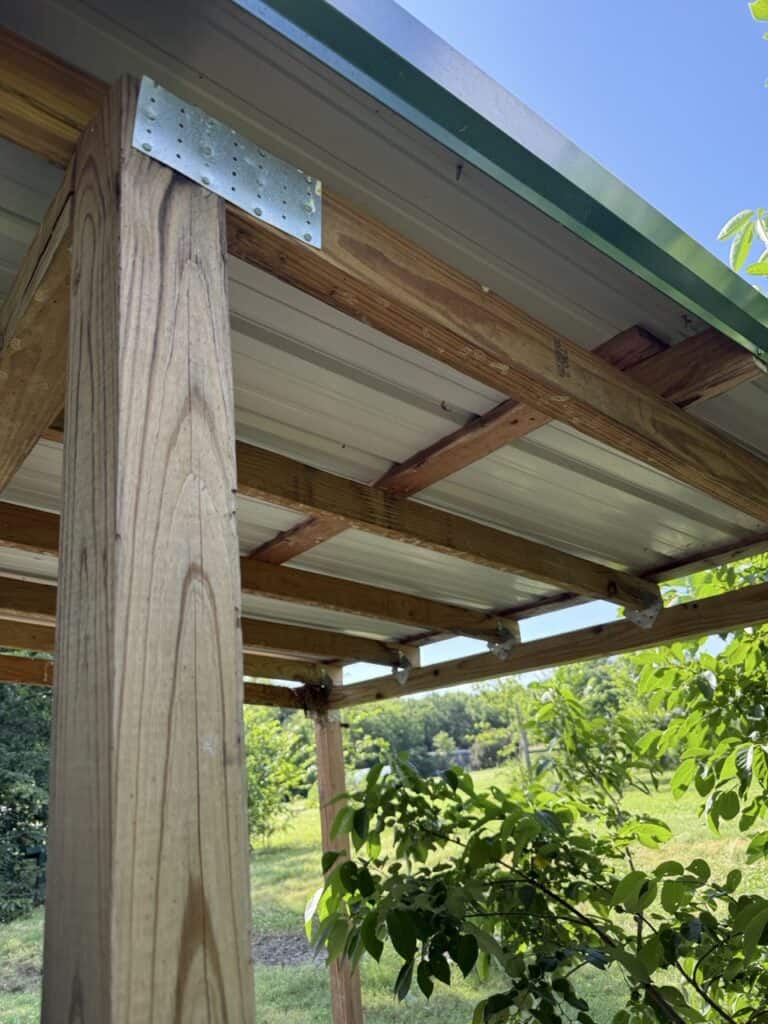
Step 5: Roof it. Lay corrugated tin panels across the rafter tops, working from the low end up toward the coop. Fasten with roofing screws fitted with neoprene washers. The washers seal around the screw hole and prevent water intrusion. Let the tin overhang the front beam by a few inches so rain sheds clear of the structure. A single layer of tin is sufficient. No underlayment is needed for a shade structure application. Local metal suppliers typically stock corrugated roofing panels and can cut them to length, which saves time and reduces waste.


Step 6: Let the animals figure it out. The first day I finished it, exactly zero chickens used it. By the third hot afternoon, the whole flock was under it by noon. They figured it out.
Making the Shade Work Harder
The lean-to handles the shade piece. The other half of keeping backyard animals safe in summer is what you do with water and airflow.
Water placement matters more than most people realize. A waterer sitting in the sun heats up fast. On a 95°F day, water in a black rubber trough in full sun can reach temperatures that animals will not drink readily. Move waterers into the shade, refresh them midday, and add a second waterer in hot weather so there is never a shortage. I put frozen water bottles into the waterer on the hottest days. Animals drink more when the water is cool and that matters for both hydration and internal temperature regulation.
Wet ground under the shade structure helps. Chickens and ducks will stand on cool wet soil and it draws heat away from their feet and legs. Rabbits benefit from a frozen water bottle or ceramic tile to lie against. Goats will seek the coolest spot available. I run a hose under the lean-to on the worst afternoons and let it soak the ground. The flock gravitates to the wet spots immediately.
Ventilation in the shelter itself matters overnight. A coop or hutch that has been sealed up and baking all day radiates heat into the night. Make sure your shelter has adequate cross-ventilation — hardware cloth panels that stay open in summer are better than adjustable vents you have to remember to open. Animals that go into a hot night already stressed are in worse shape the next hot day.
What I Would Do Differently
The lean-to itself I would build the same way. Two years of Oklahoma weather and it has not budged.
If I were starting over I would make it deeper. Six feet gives the flock shade during midday, but on a bright afternoon when the sun is lower in the west, the light cuts under the front and the shaded area shrinks. Eight feet of depth would keep more of the run in full shade through late afternoon. That is the one thing I would change.
I would also put a feeder under the lean-to during summer, which we did a little later. Animals that are hot eat less, and having feed in the shade encourages them to keep eating through the heat of the day rather than waiting until evening.
Frequently Asked Questions About DIY Shade Structures for Backyard Animals
Can this shade structure be used for animals other than chickens?
Absolutely. The same lean-to design works for ducks, goats, pigs, rabbits, and dogs. Dimensions may need adjusting for larger animals like goats, but the basic build — 4×4 posts, 2×6 rafters, corrugated tin roof — scales up easily. Any backyard animal that cannot seek its own shade needs a structure like this in summer.
How long does a DIY shade structure like this take to build?
Plan for a half day to a full day depending on your experience level and whether you are working alone. Setting posts in concrete is the step that adds the most time since you need to wait for the concrete to cure before loading the structure. I set posts one day and finished the build the next.
Is shade cloth good enough for backyard animals in summer?
Shade cloth works for mild heat and is a reasonable temporary solution. For sustained high temperatures or permanent setups, a solid roof structure performs significantly better. It provides complete sun blockage, does not degrade with UV exposure, and holds up to wind and weather far better than cloth attachments over multiple seasons.
How deep should a shade structure be?
A minimum of 6 feet of depth provides adequate shade during midday hours when the sun is directly overhead. Eight feet or more maintains shade through a longer portion of the afternoon as the sun angle changes. If you are building for larger animals like goats, err toward more depth and width to give the whole herd room to get under it at once.
Do I need a permit to build a lean-to shade structure?
In most rural and semi-rural areas, a small accessory structure attached to an existing outbuilding does not require a permit, but local codes vary. Check with your county before building if you are unsure. Most agricultural outbuildings are exempt from residential permit requirements in areas zoned for livestock or homestead use.